

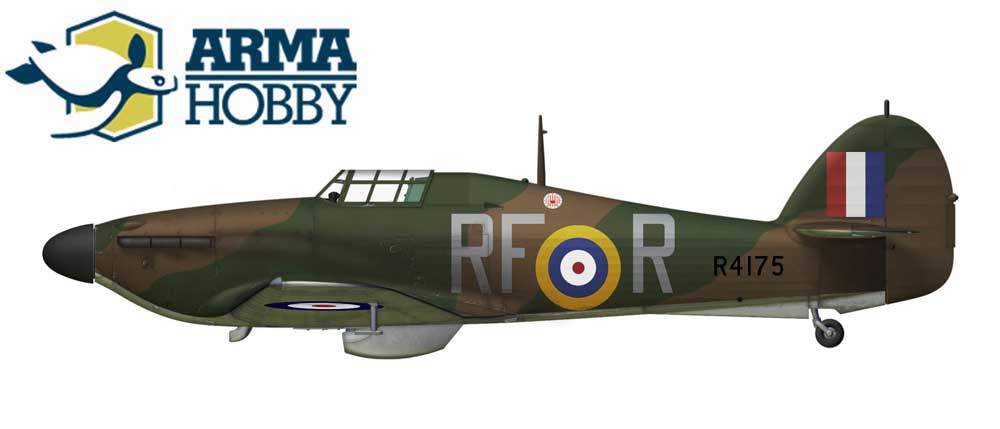
The Hurricane was a true “workhorse” of British aviation. The RAF and the Fleet Air Arm operated it from the very beginning right through to the end of World War II. This time I’m presenting a model of the aircraft in its later service period – in the summer of 1942.
The airframe shows clear signs of hard, honourable use: from the Battle of Britain in RAF service to pilot training duties with the Fleet Air Arm at Yeovilton.
Model and extras
I built the model in an out-of-the-box scheme. I also used 3D-printed parts available as digital files (link in the kit instructions). They were offered during the pre-order and will occasionally appear in our shop as well (link to the kit at the end of the article).
I also used a few simple additions described in the previous article (link below), plus the brand-new White Stork Miniatures figure – absolutely superb.
Painting the Hurricane 1/48
The aircraft had been repainted many times. In the end it wore the maritime camouflage scheme (Temperate Sea Scheme), had its right wing replaced (the dirtier one), and some engine cowling panels came from another aircraft painted in the Temperate Land Scheme.
I painted the model using the photos discussed in the reference article (link below), with AK Interactive lacquers and Hataka Orange Series paints. After priming (Surfacer 1500 Black), I painted the parts in colours reflecting the original construction materials.
Hawker Hurricane P3090 – od myśliwca Bitwy o Anglię do służby w Fleet Air Arm
Metal parts were painted Airframe Aluminium (Ammo MiG), while wooden and fabric-covered areas got a red primer shade (Dull Red, Alclad). I then painted the model in sections:
- first the underside in Sky (MRP),
- then the Temperate Land Scheme areas – Dark Green and Dark Earth (Hataka),
- finally the maritime colours: Extra Dark Sea Grey and Dark Slate Grey – AK Interactive lacquers.
I created paint chips down to bare metal using Vallejo masking fluid, applied with a sponge and a toothpick, trying to reproduce the damage seen in the photos as closely as possible. I fully masked selected panels (the handhold access flap under the cockpit, the fairing strips where the wings join the centre section, etc.) so that after the next painting stage they would end up a slightly lighter shade. Then I painted everything with the appropriate camouflage colours.


After removing the masking fluid, I toned down some of the scratches—and also the separately masked panels—by gently misting the camouflage colours with various lighteners added, and with RLM Grau from AK Interactive. It works well with both Sky and the maritime camouflage.
One observation: the metallic colour should be lighter—perhaps even chrome-like. Airframe Aluminium, although excellent for all-metal aircraft, doesn’t “pop” very well as chipping under strong camouflage colours. By contrast, the aluminium on the propeller spinner (probably Gunze C8) showed through much more clearly.
Finally, I added light grey blotches and patches in various colours, based on the original photos. I tried to capture the different levels of wear in the primer layers compared to the original camouflage.
Pilot figure
Pilot miniature came from White Stork Miniatures. I primed the figure in black, then sprayed white from above to create contrast between raised details and recesses. Next I applied 1–2 coats of AK Quick Gen figure shading paints.


I really like the result—especially considering the whole figure took less than 30 minutes. It just required careful work on details partially hidden behind the pilot’s arms.
Would you like me to share a step-by-step tutorial on painting the pilot figure? Let me know in the comments!
Weathering
I weathered the model with an oil wash, then added very heavy staining on the underside using an airbrush.
The characteristic grime along the edges of the fabric-covered fuselage structure behind the cockpit was originally going to be done with drybrushing and black paint, but I found a faster and more convenient method: rubbing the surface with the side of a watercolour pencil. Quick, clean, and hassle-free.
Additional weathering was done with dry pastels to simulate airfield dust and areas frequently handled by the ground crew.
See also:
👉 View the Hurricane Mk I kit in our shop: link
Model photo gallery


Trzy Hurricane’y z premierowego pudełka 1/48… a malowania są cztery!


Modeller happy enough to work in his hobby. Seems to be a quiet Aspie but you were warned. Enjoys talking about modelling, conspiracy theories, Grand Duchy of Lithuania and internet marketing. Co-founder of Arma Hobby. Builds and paints figurines, aeroplane and armour kits, mostly Polish subject and naval aviation.
This post is also available in:
 polski

