
We have a great pleasure to present a step by step article on Yak-1b in Luftwaffe markings. Robert Wójcik, author of the r-miniatures blog and modelling articles in magazines explains how he has built the Expert Set.
Yak-1 B Expert Set
Yak-1b is an important aircraft for Polish modellers. Many of us started an adventure with this hobby with a model made by ZTS Plastyk. Together with Il-2, it found its place on shelves in our homes. We did not moan and took what was available and had the pleasure of them. Later, when we opened for the world and gain access to models made in the West, we dreamed about Polish models made to international standards. It took several years, and we can finally say that it is better. Although some wet blankets can never be satisfied, Polish models finally get traction. Yak-1, although in a different version, gained worth successor.
The first Look
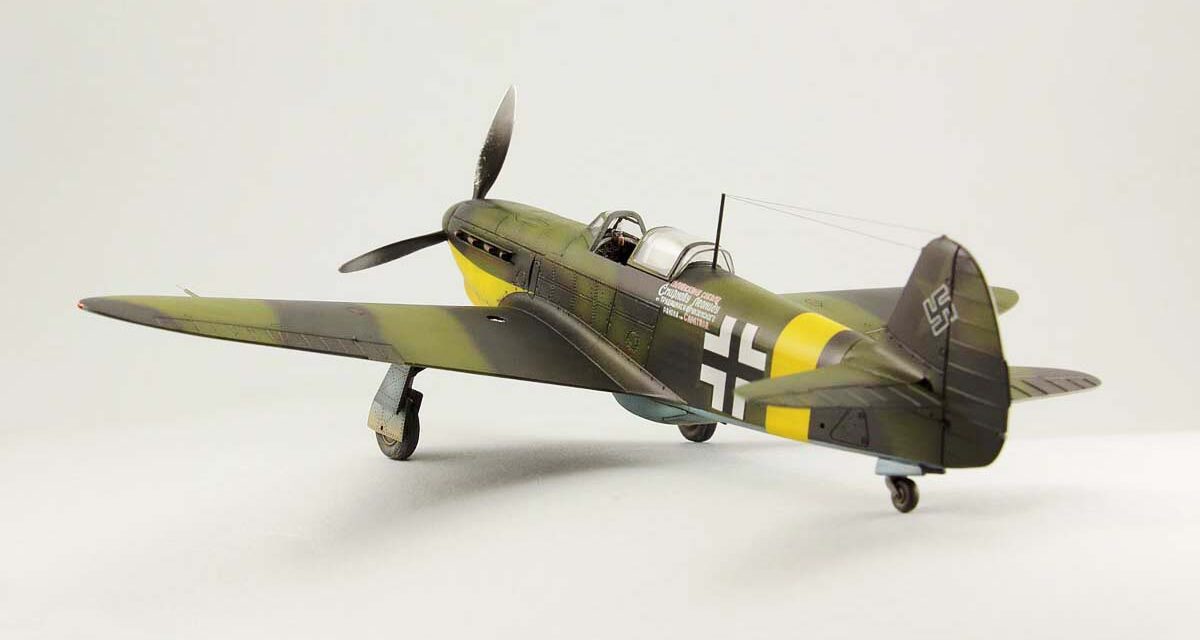
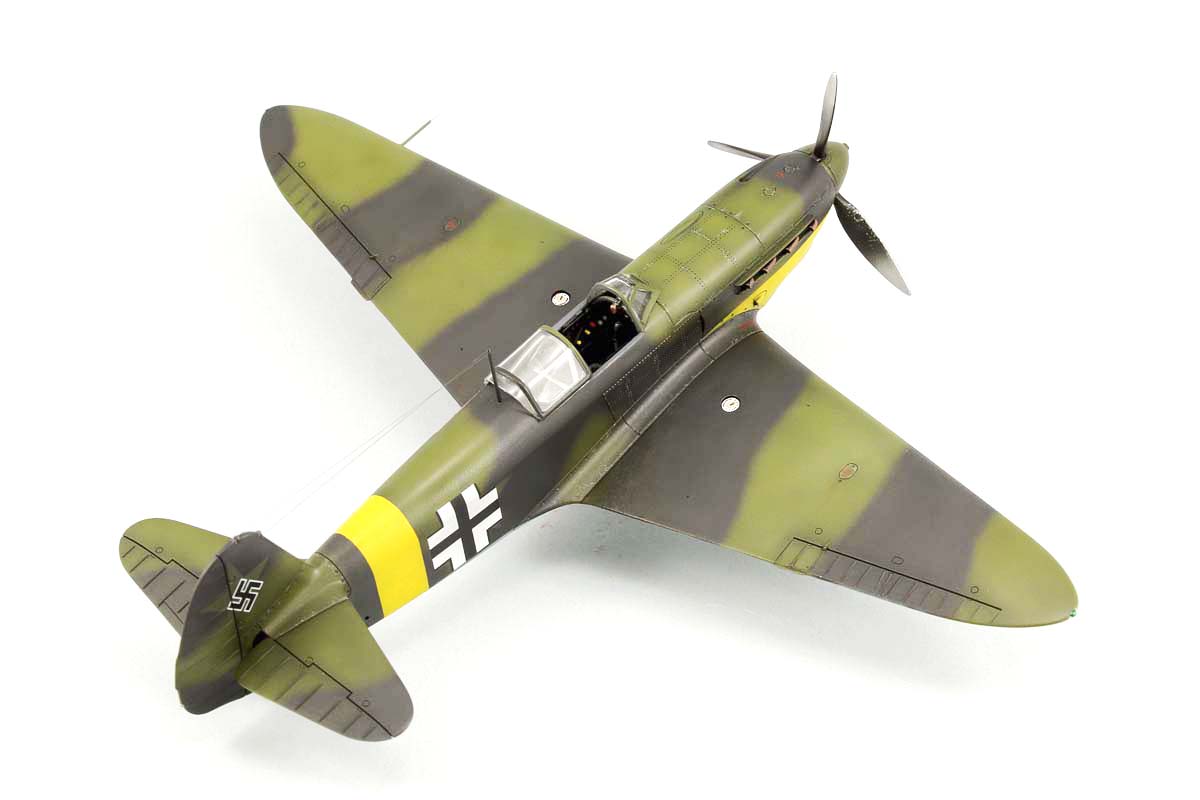
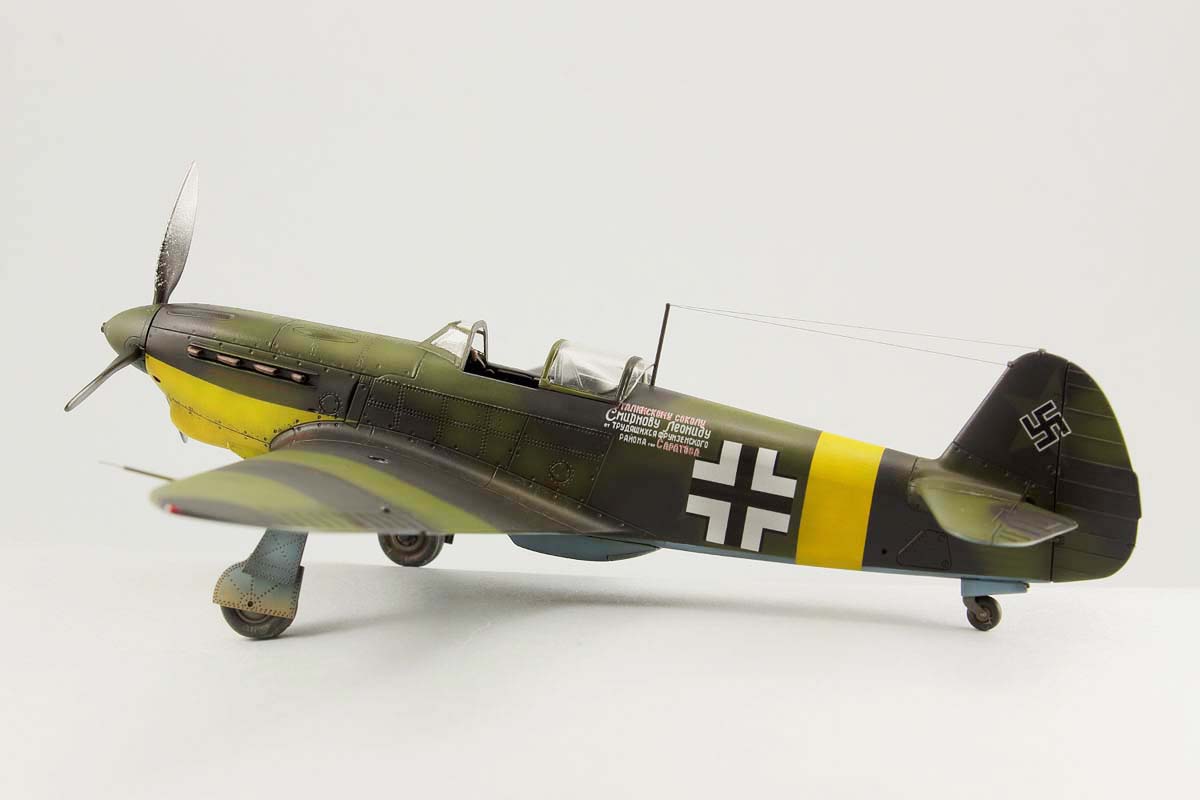
I am generally inspired by captured aeroplanes. Although Yakovlev machines have not been in my focus of attention, first photos intrigued me. Then I looked at painting options, and I new that Smirnov’s Yak-1 captured by Germans would be mine.
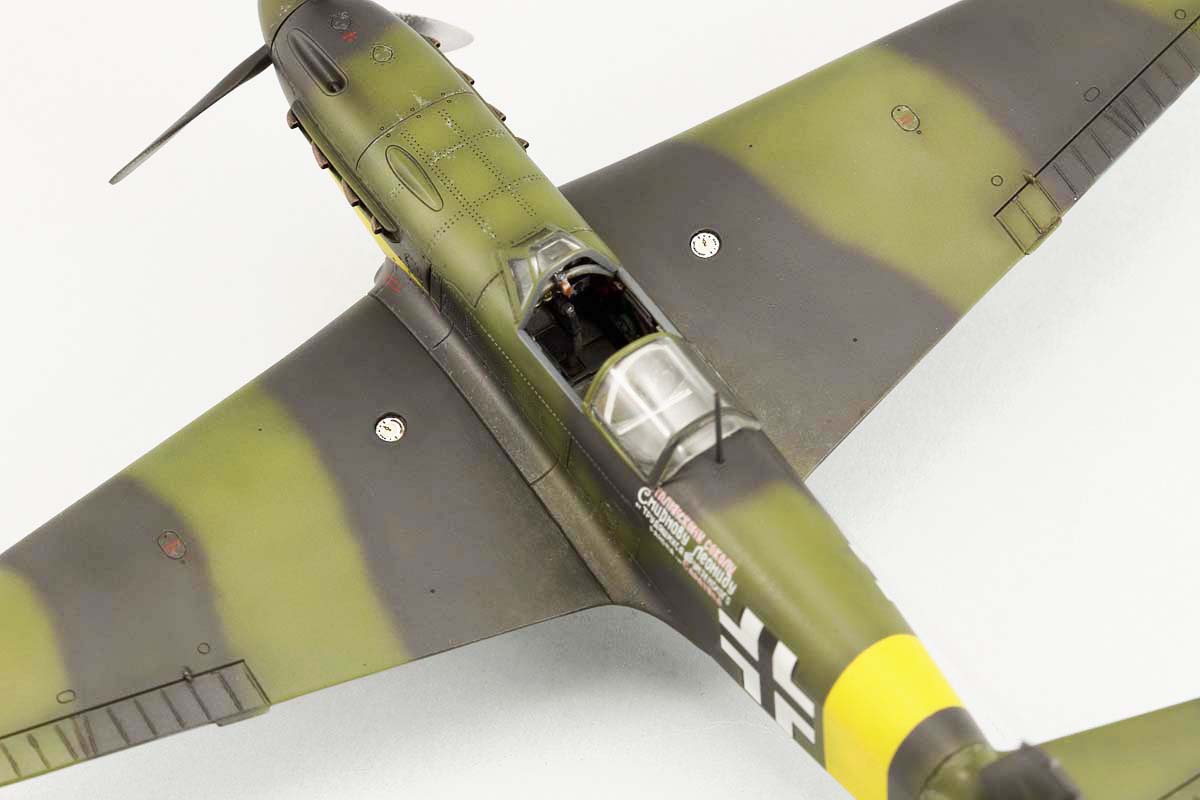
The sprues look very good. The parts have a smooth, satin surface, without orange skin effect. Unfortunately, in some places, we can find small sink marks ( in my model I found them on tailplanes and fuselage, near cockpit), but they are easy to remove. Apart from this, there are no other issues – the parts are moulded clearly. The set also includes painting masks and small photo-etched fret with details that improve the look of the cockpit and useful cooler net which are very visible. The design of the cockpit is thought out and look tridimensional. Its detail, with the photo-etched parts and decals, are enough to make a complete miniature.
However, it is worth mentioning that if we want to add more details, the companies that make aftermarket parts also stepped up to the mark. The riveted surface makes the model look better. Especially if we take into account that the plywood covered wings and part of the fuselage of the original plane, which makes the surface look bland. Leaving the fuselage and wings only with panel lines could make it look empty. The ‘glass’ is clear but, unfortunately,
moulded as one part. It is a pity because the cockpit look is too good to close it. The chosen painting options allow us to make attractive miniatures – we get Yaks with black and green camouflage, Yaks in greys, with the Polish red and white Checkerboard and used by other foreign units. We also get one in winter camouflage option. It is necessary to add that the available aftermarket decals komplement the options from the box, so it is worth searching through the market if someone looks for further inspirations.
Assembly
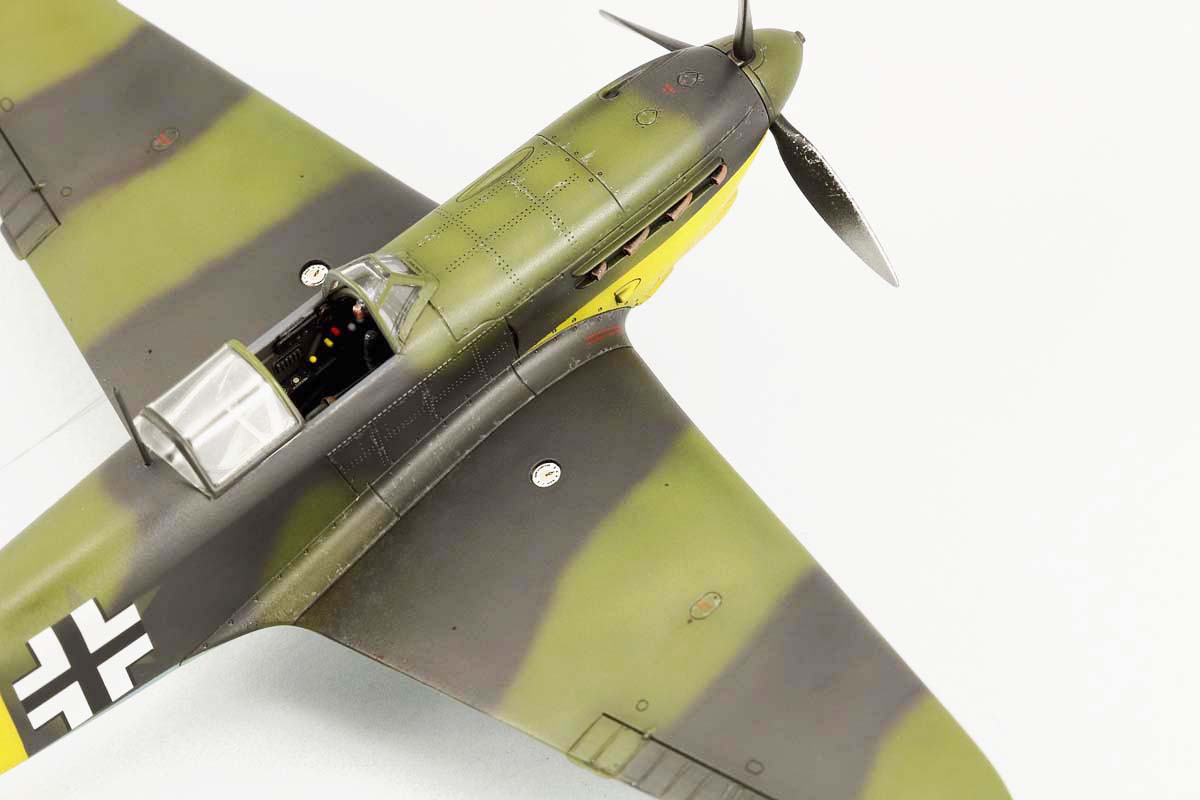
As usual, I started with the cockpit, which, as I have mentioned, looks very good. Out of curiosity, I decided to add some parts made by a Polish company – Yahu Models. Their instrument panel is astonishing, and it is already assembled, which gives it an advantage over other makers. Although it has special cut-outs, I decided to remove part of a frame in place when it is attached. But to be honest, the same result we can have with the instrument panel included in the PE fret, although its assembly requires some time and work. For those who are less demanding, there is the third option – there are decals to place on the well-designed plastic instrument panel.
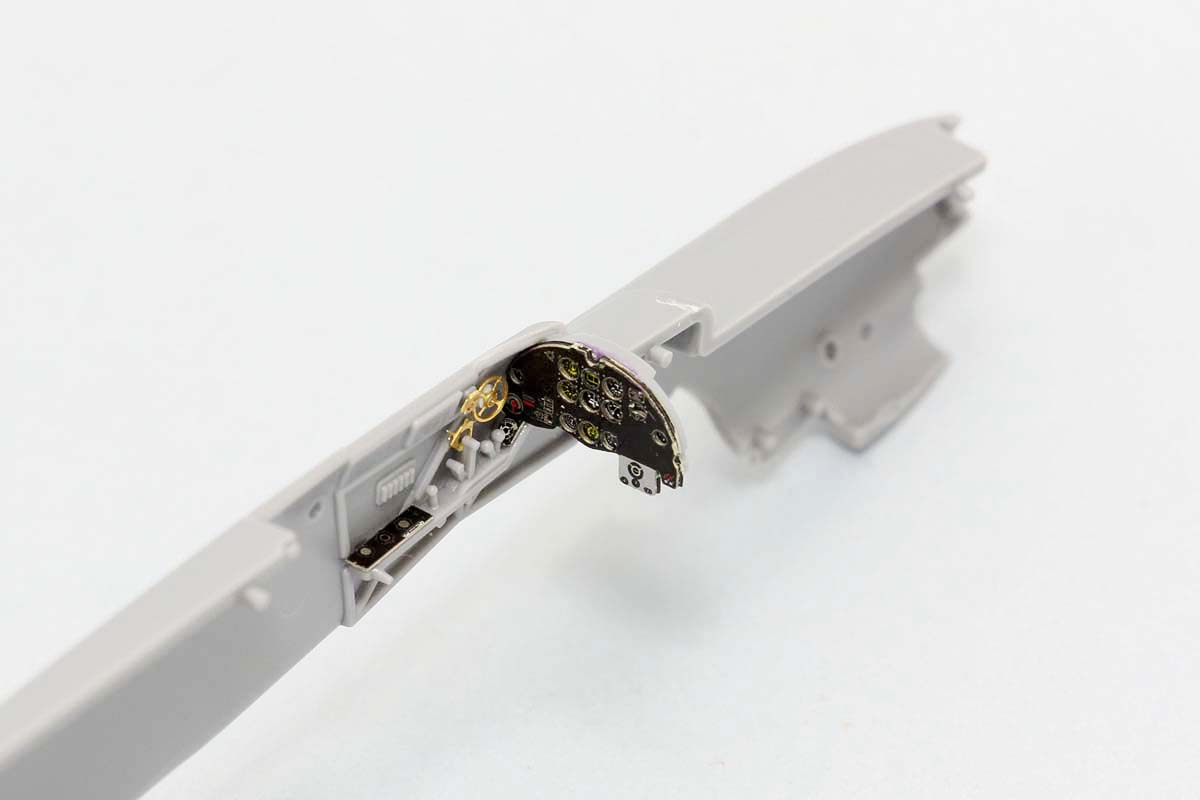
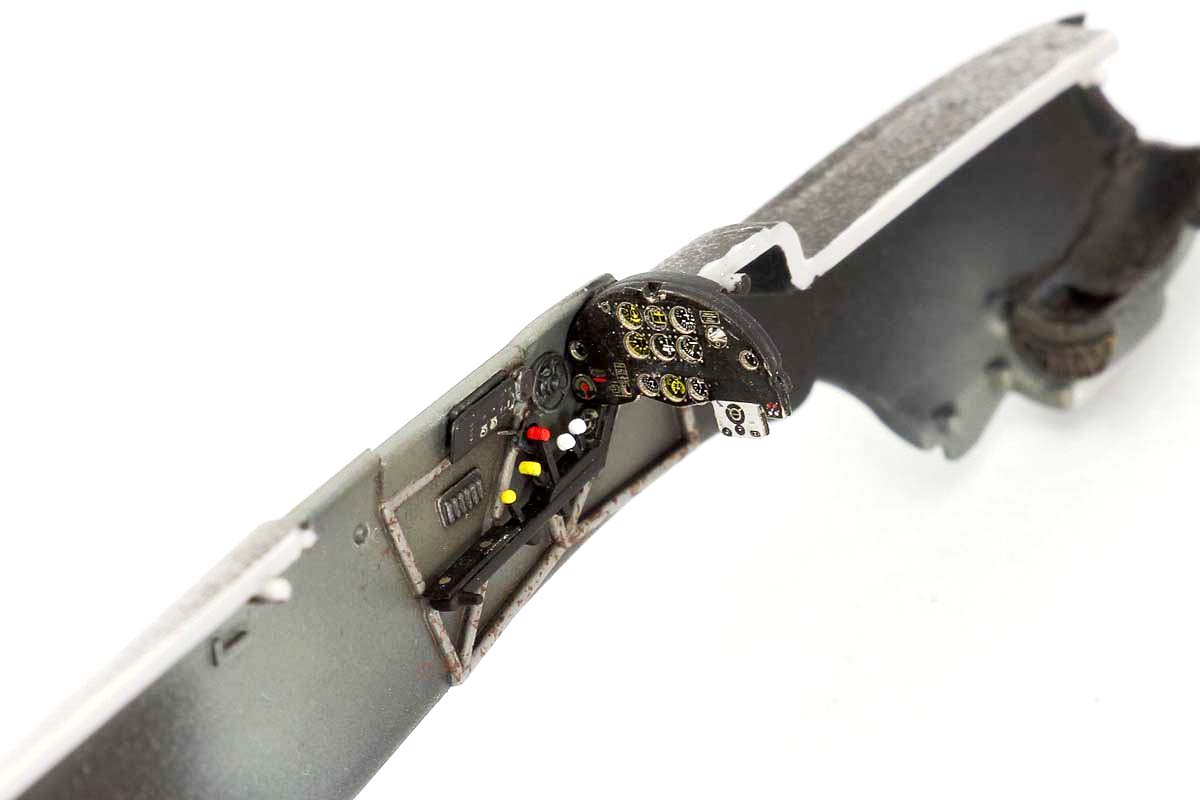


1-6) A glance at interior details. Photo-etched parts from the set and colourful Yahu Models plates are a successful combination.
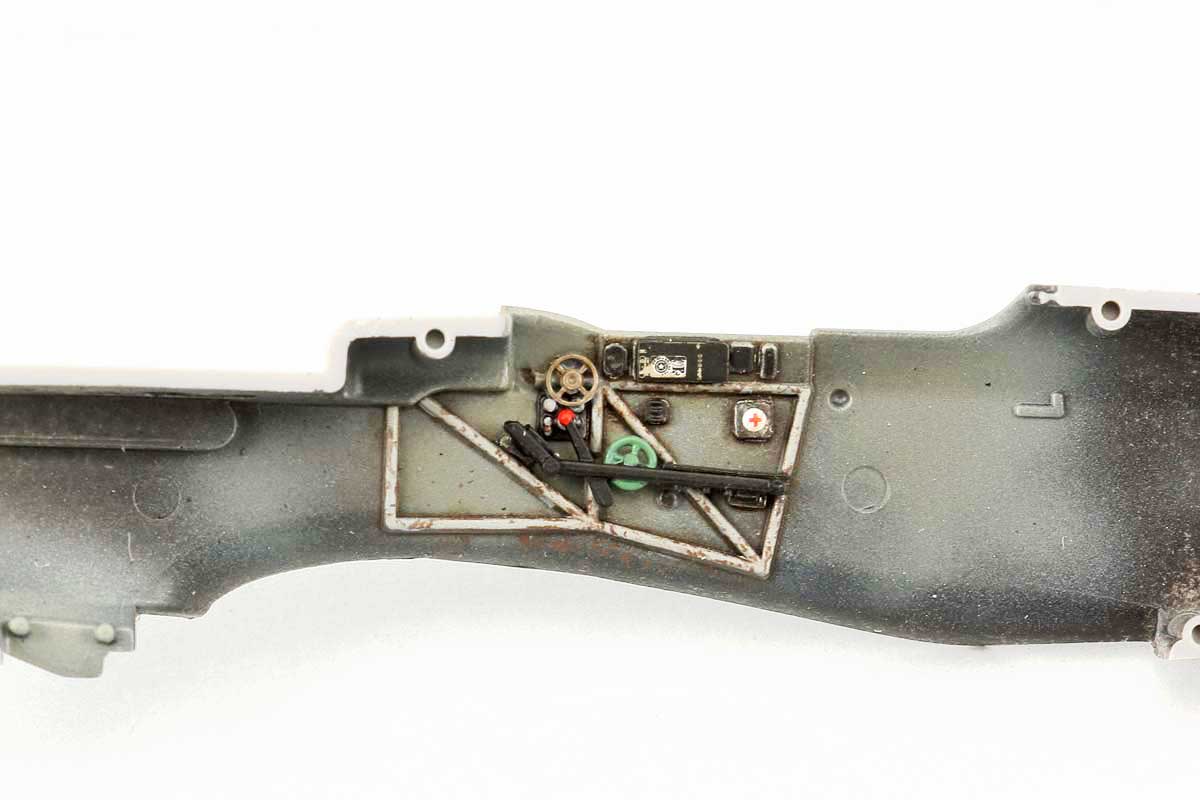
Apart from the instrument panel, Yahu also makes coloured cockpit sides with levers. Although these parts look good, in my opinion, the plastic parts are so good that using photoetched is not necessary. I decided to mix both elements and cut indicators and instruments which I attached to plastic sides with handles. I also used Yahu photoetched radio (the model also includes PE parts and decals). I attached PE harness to the pilot seat, added
some small PE parts, and I painted everything with black primer. The colour used to paint interior surfaces of Soviet aeroplanes was Interior Steel Grey A-14. I think that only AK Interactive makes its equivalent (RC 319). These paints are quite nice, although this very paint tended to delaminate in the airbrush cup, unlike others I used to paint Yak. I applied the paint so that the black primer remained in the hollows, which created clear chiaroscuro.
I brush painted the frames and other protruding elements with a lighter colour to enhance the contrast of the relatively dark interior more. I painted the details with Vallejo paints, which I also used for chipping and a dry brush technique. The final touch was a wash made with Brown oil paint. I painted a lot of elements separately and installed them only when assembling the interior. I do not know if it is the fault of the additional metal parts, but at this point, I ran into a problem with mounting the back of the pilot seat, which did not want to fit into the fuselage. I dealt with it by trimming the sides, and I suggest dry fitting before assembly.
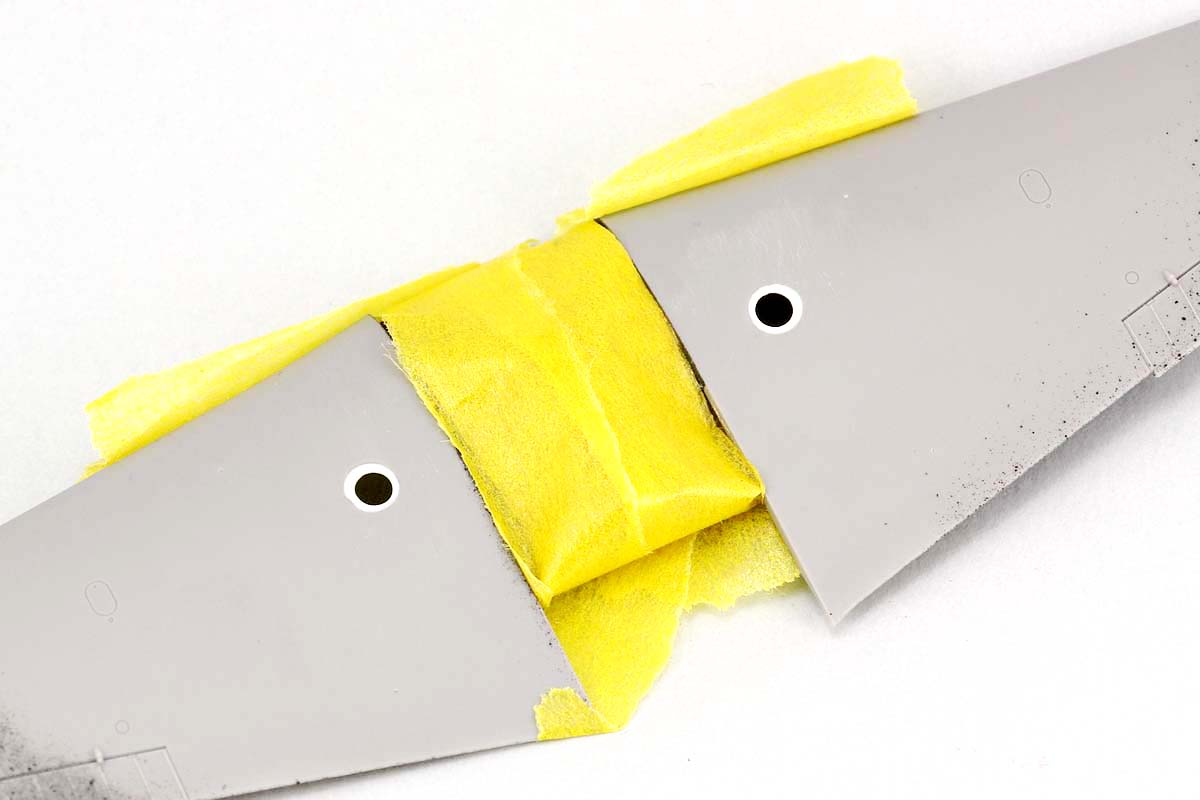
7) To install Yahu Models photo-etch fuel gauges it is best to drill wings through and stick them underneath. As the first approach was not satisfactory, I decided to paste a thin strip of plastic into the wings.
The fuel gauge mounted in the wings were the last Yahu parts I used. In the model, they are shown as recessed dividing lines, which should give a nice effect when properly painted, but still, it is a pity that they are not in the form of, for example, decals. Nevertheless, the Yahu parts look great and are worth installing. If you want to install them, it is best to drill through the wing surface with a drill of a slightly smaller diameter than the plate, thin the hole and glue the PE part from below. As it did not work out well the first time, I pasted fragments of plastic into the wings that did not require any additional thinning.

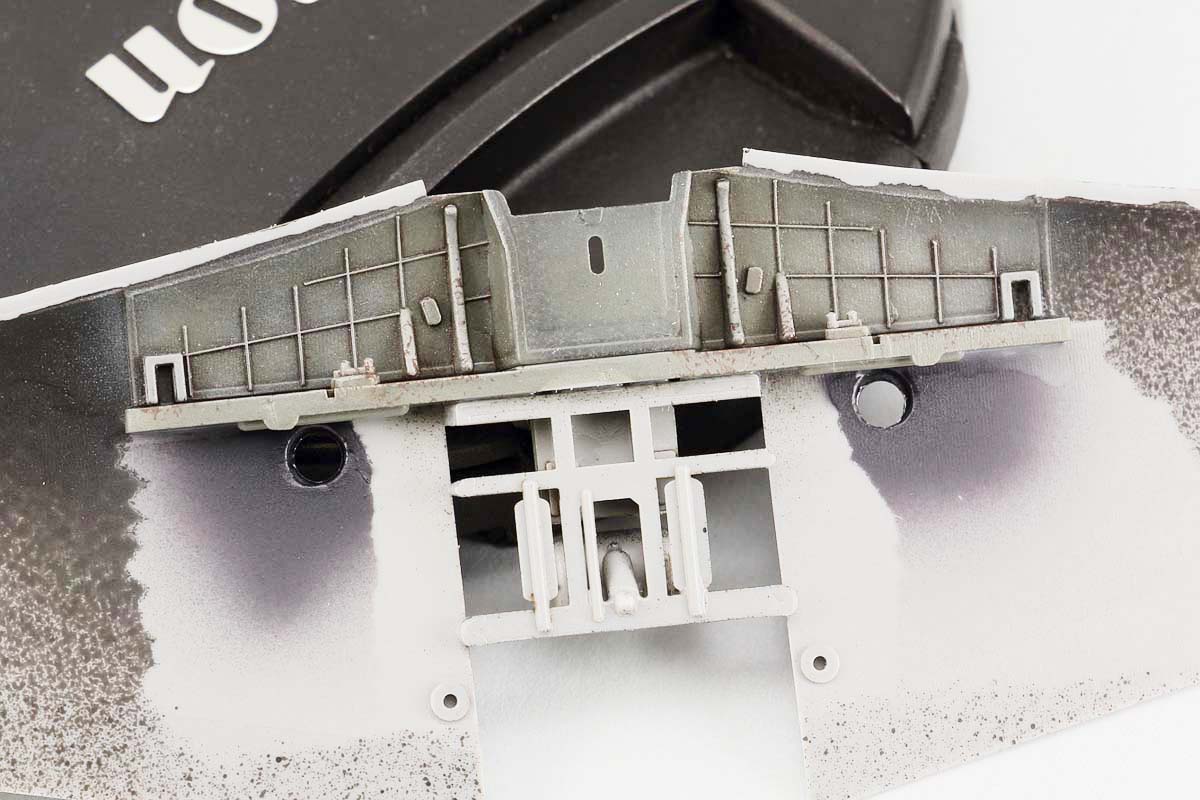
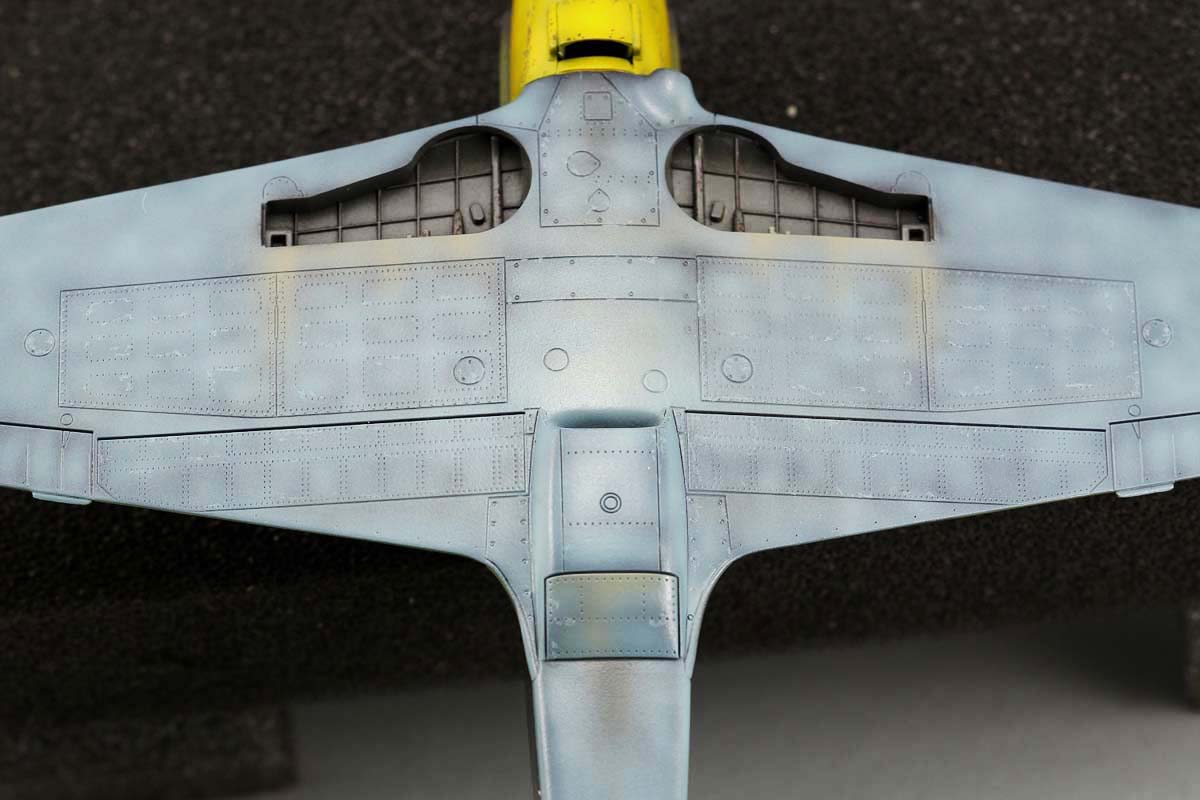
8-9) A lot of interior details are mounted directly to the wing. After covering the area of the holes in the wings with the colour suggested in the manual, it was finally possible to install the instruments. You can also clearly see the blue shade of Night Black paint, which I eventually replaced with the AK colour.
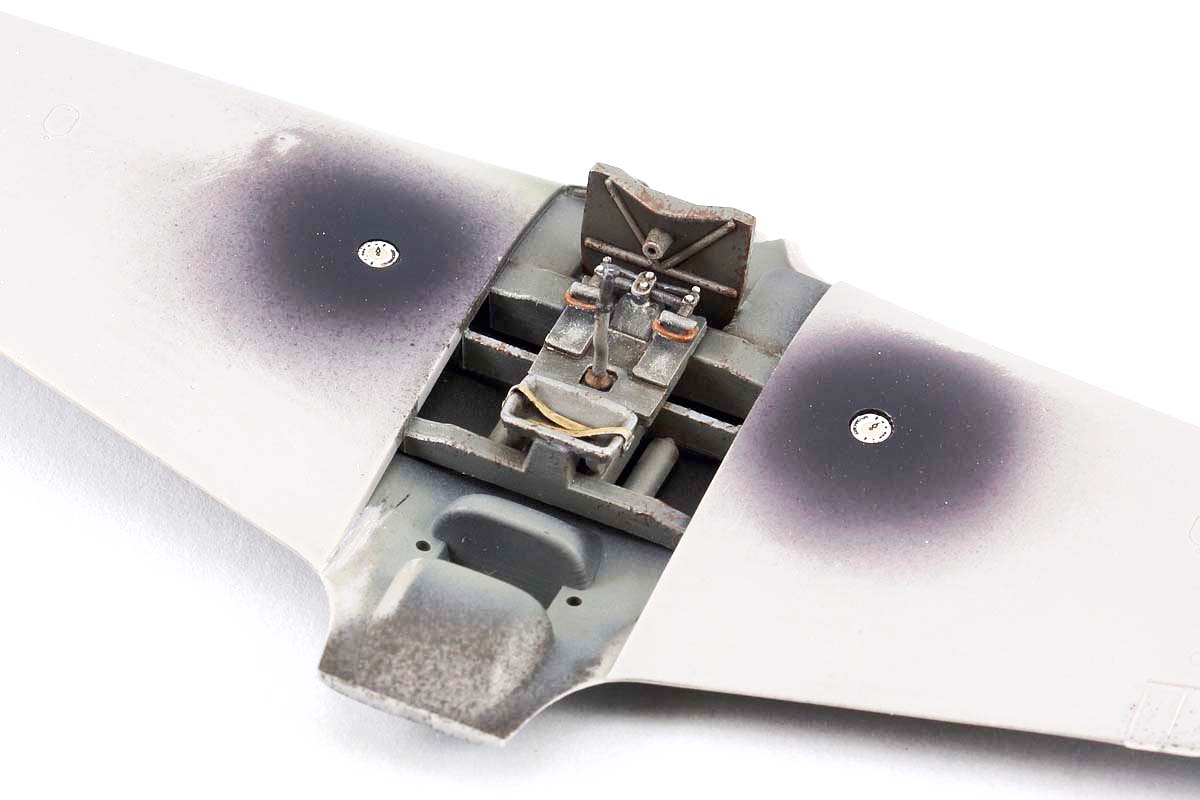
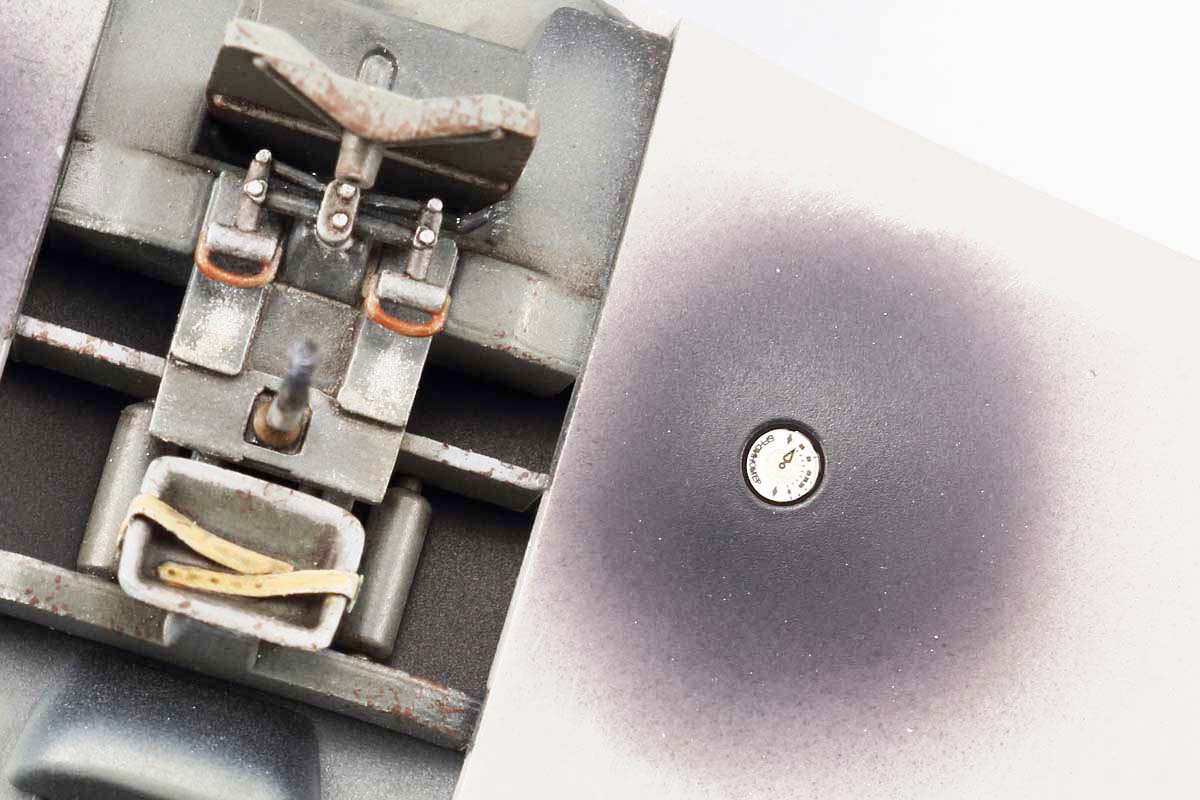
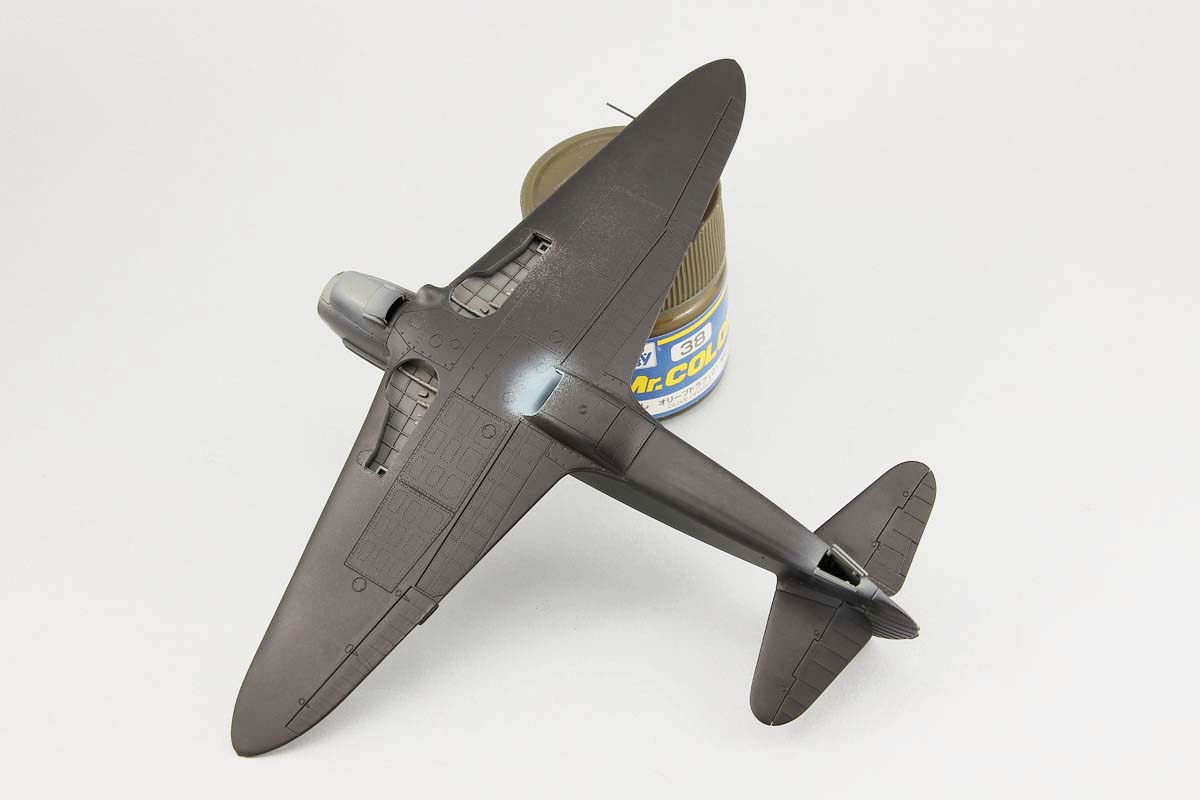
Before putting the model together, I also painted the undercarriage bays, which, like the cockpit, have great details and are the strong point of the miniature.
The parts of the model generally fit together very well, but it is worth mentioning that their fit is quite tight. It is Worth remembering when processing and painting because both too much sanding or too thick a layer of paint can complicate the assembly. In general, I recommend dry fitting the elements, which will ensure the build without the use of putty.
10) A look at the incredible detail of Yahu Models. It is worth investing time in assembling these accessories because they significantly increase the attractiveness of the miniature.
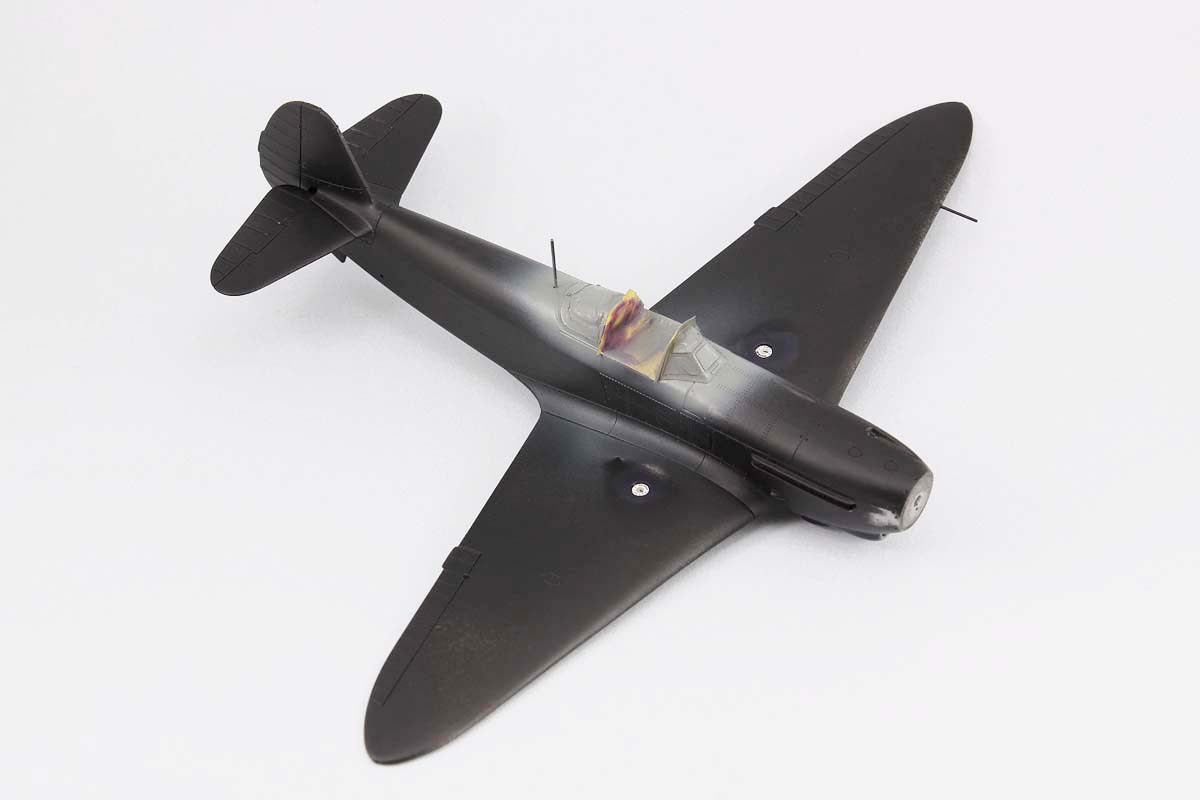
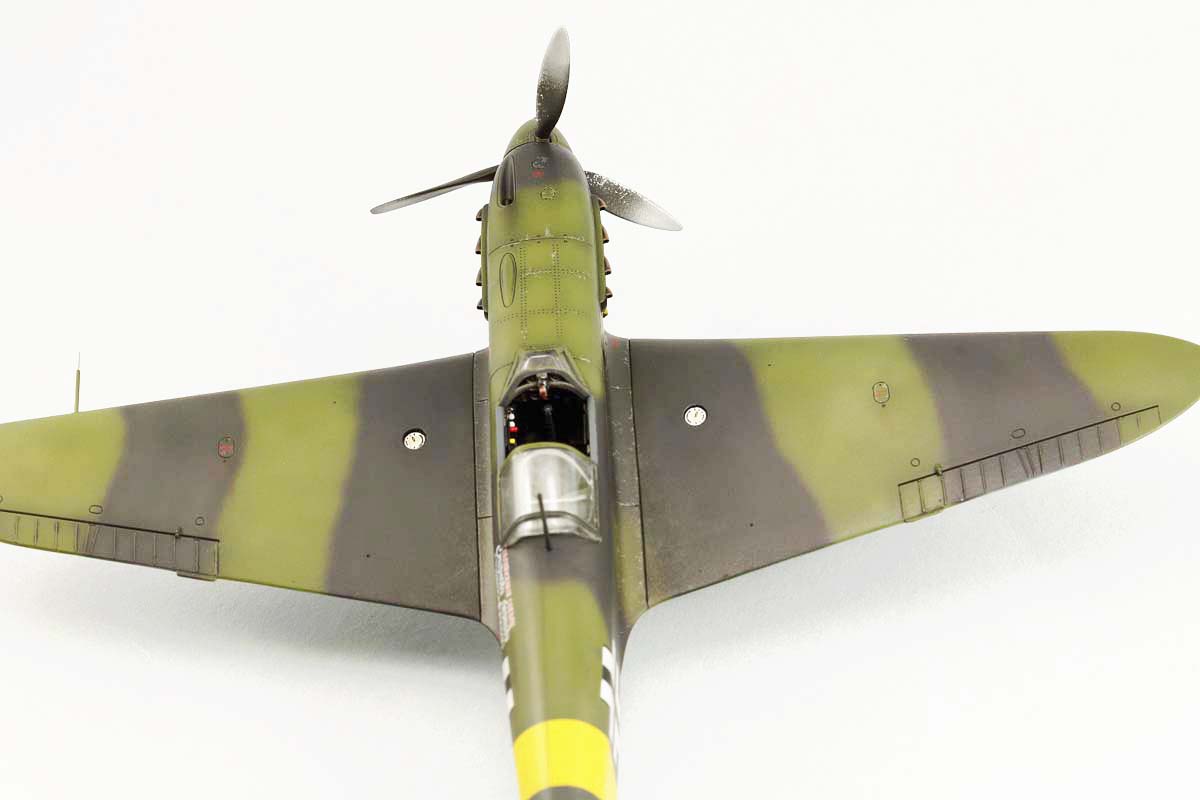
The last part to attach before painting the model was the glazing. As I spent a lot of time working on the cockpit, I decided to open it. An additional argument for this was the unusual, extended shape of canopy slidinghood of a model I made, clearly visible in its photos, which in the closed glazing of the model can not be properly recreated. I cut the cockpit canopy into three pieces and replaced the sliding part with Brengun vac. Interference with the set glazing also forced a slight thinning of its side frames, which in turn meant the need of adjusting the masks. Although the Brengun made vacuformed canopy for their model, it, fortunately, fits the Arma Hobby Yak. Brengun has prepared the glazing in two versions, open and closed, so deciding on most of the painting options, we have a buffer in the form of an additional part, in case something goes wrong. However, due to the aforementioned extender rear of the canopy sliding hood, the only element to use is the closed option, which must be cut with an appropriate allowance imitating an additional plexiglass strip from the original plane.

11-12) The landing gear bays is also a small piece of art. After proper painting, details definitely catch your attention.
Painting
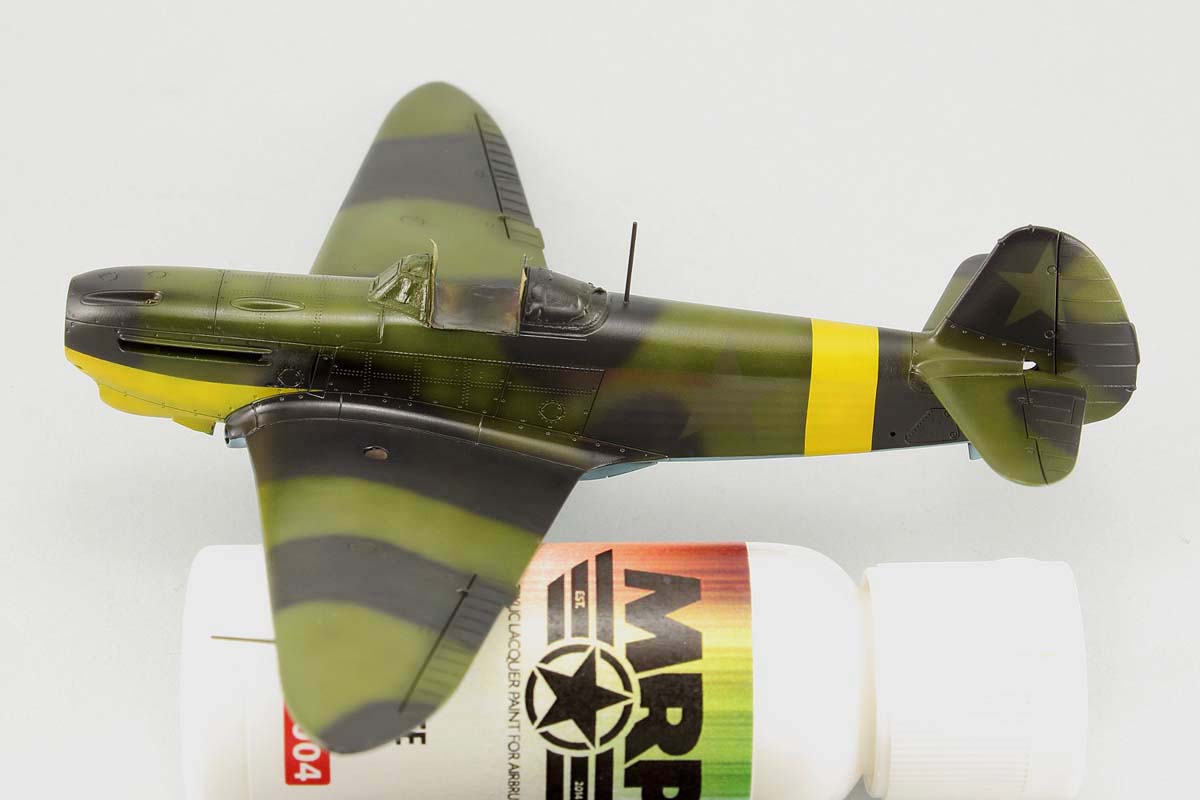
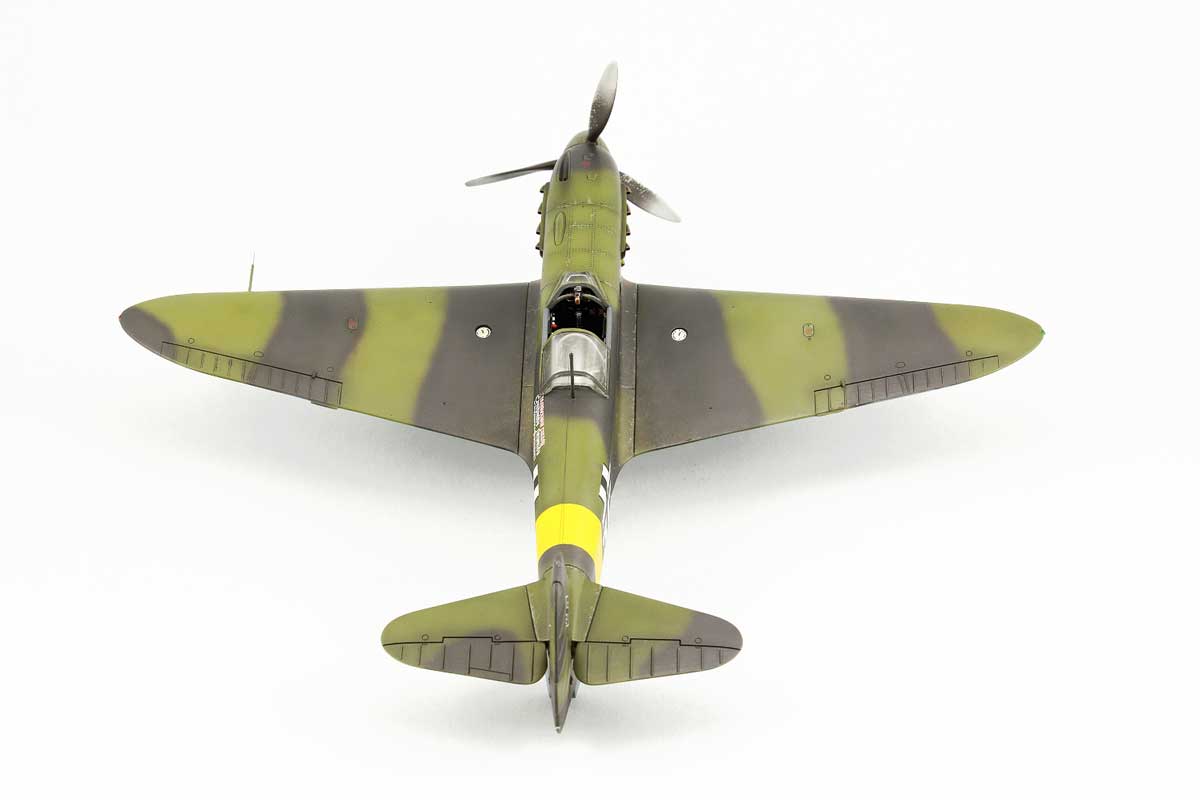
I primed the model with a black primer, on which I applied the target colours unevenly by hand. I started with the yellow on the bottom of the engine cowling and the tail stripe. As a base, I used white and then applied thin layers of the target colour. I note here that the manual overlooked that the yellow band was also on the bottom of the plane, which is clearly visible in the photo of the original. Taking into account that the left side of the aeroplane has a lot of markings, I recommend that you try on all decals dry at this stage and make sure that the foundation inscription, the cross and the belt will fit between the cockpit and the tail and maintain the correct proportions.
13-14) The beginning of painting was quite a popular black primer on which I then applied transparent layers of the target colours.
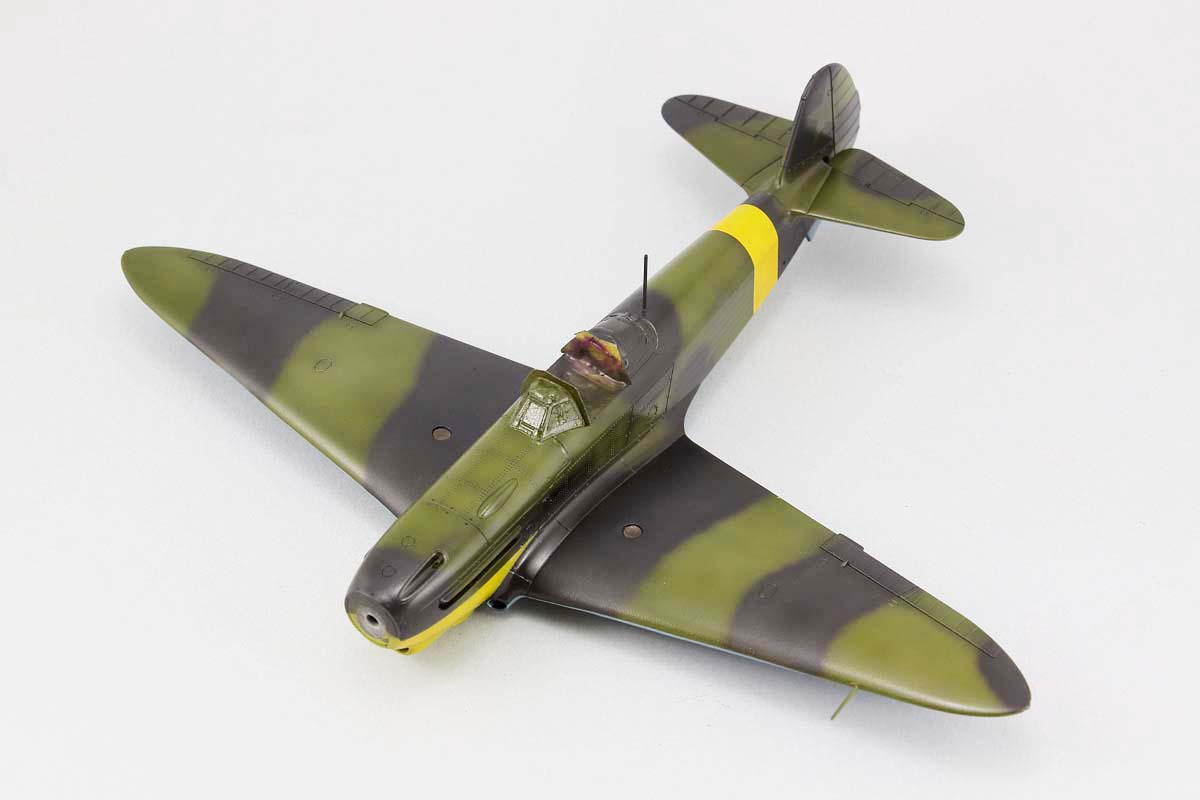
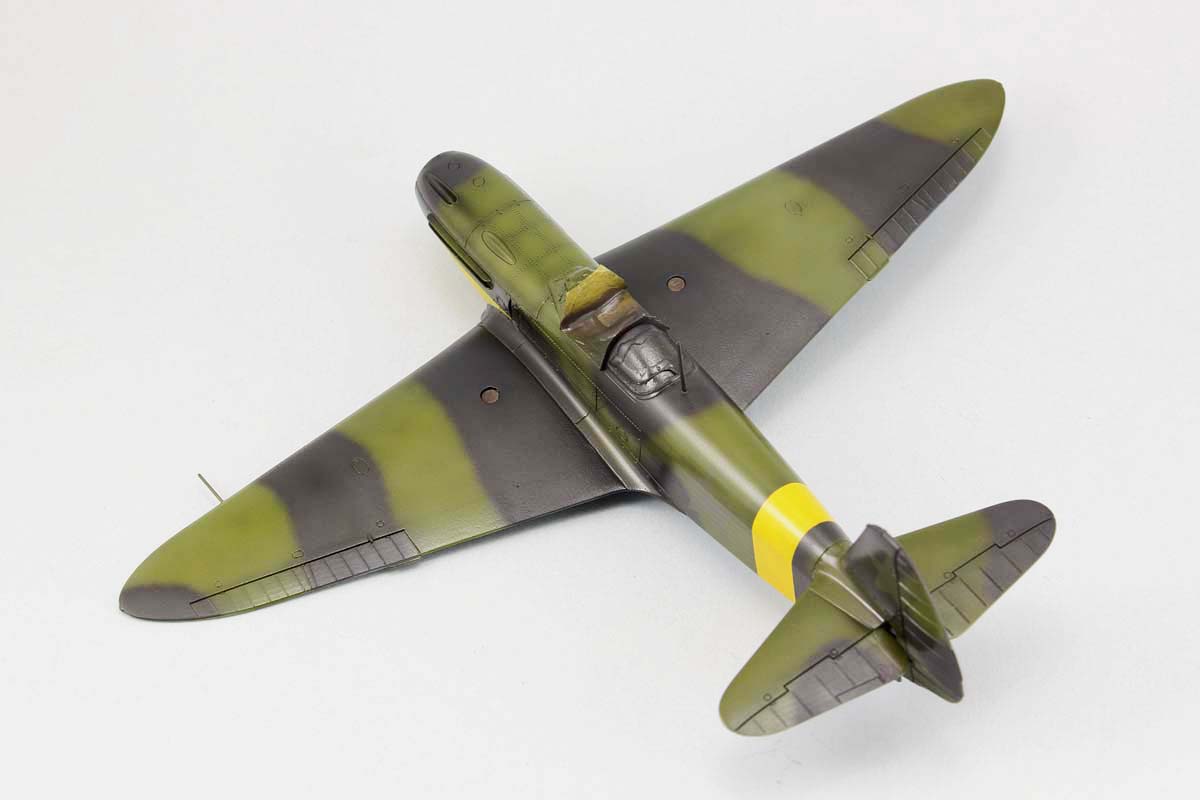
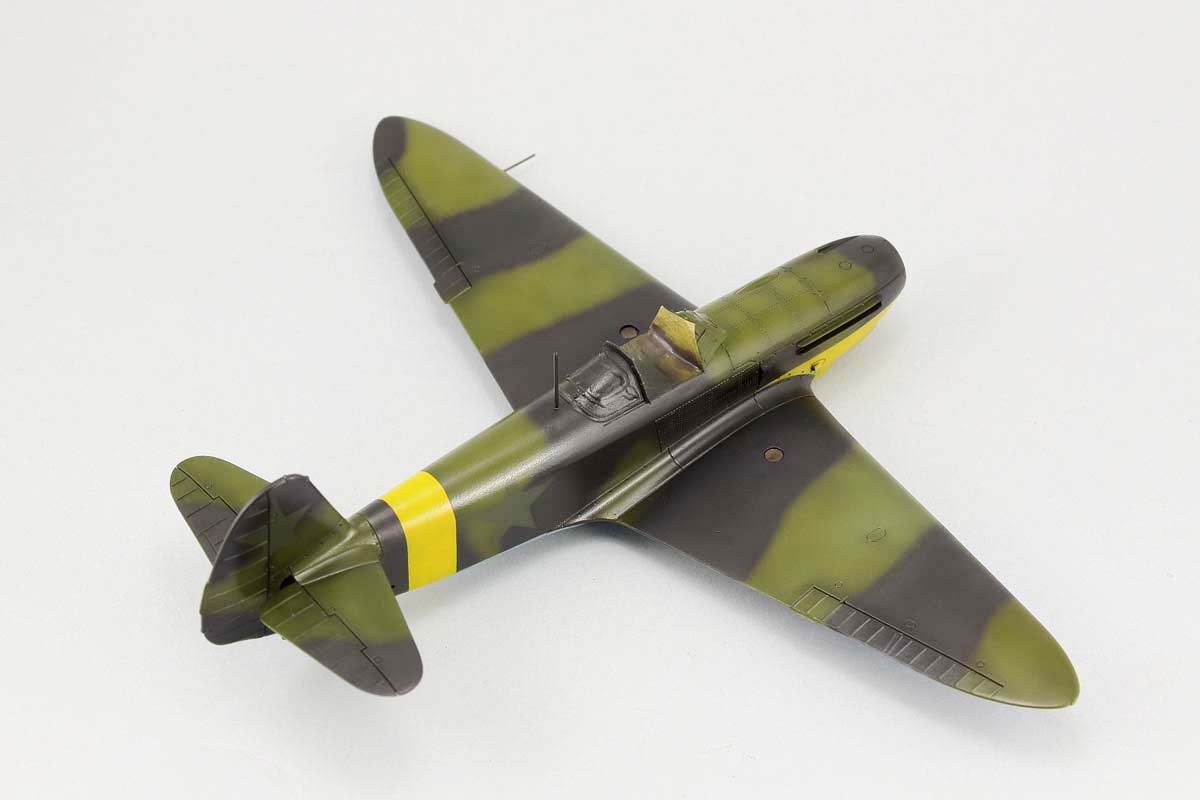
The original Soviet camouflage pattern was fairly standard. I used Hataka Orange C 072 blue paint (AMT-7) and green AMT-4 and black 6RP made by AK (RC 315 and RC 071, respectively). The producer suggests using Hataka C 041 Night Black as black paint, but for me, this colour is too dark blue, and I think that the AK colour looks more authentic. I applied all the colours with small spots and lines, filling the spaces between the dividing lines and rivets, as well as differentiating large uniform areas of the plane devoid of these details.


15-17) I like to start painting with poorly covering colours. Parts which I was going to paint yellow I first primed with white paint.
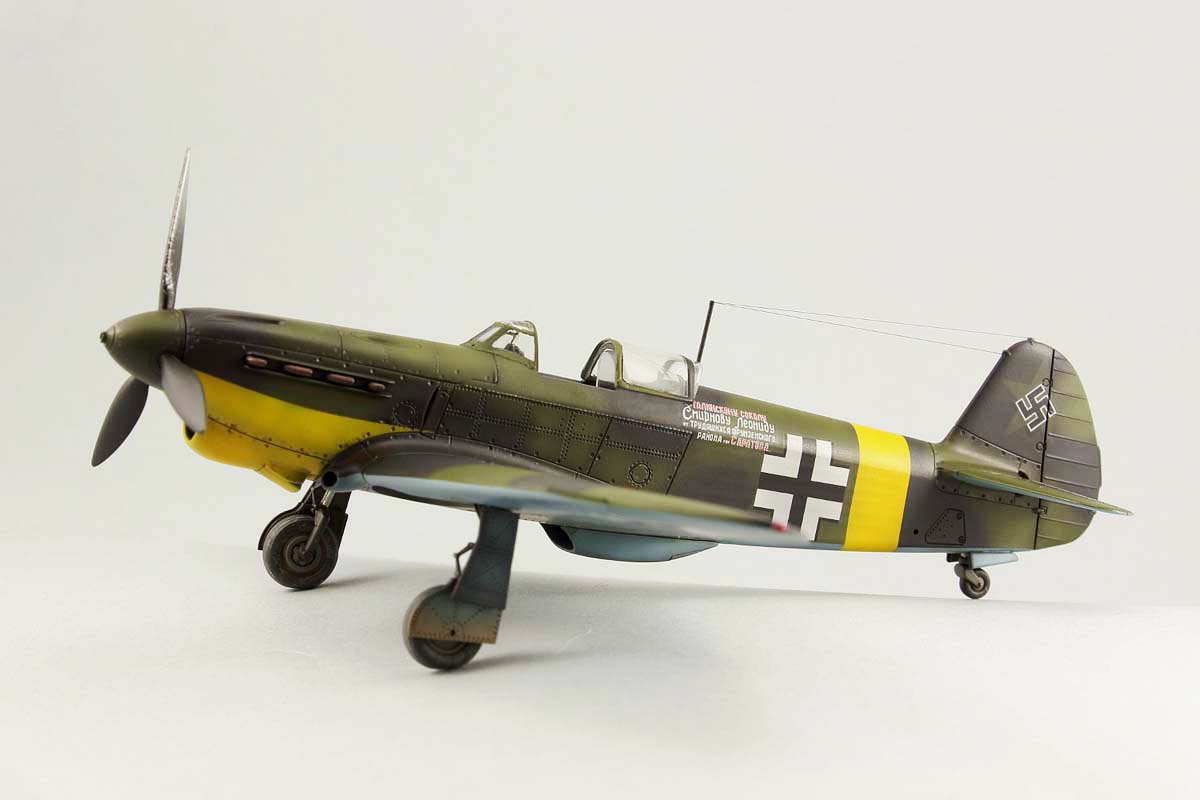
The fun began as usual with the image of the captured machine. There is one photo from the period I am interested in, i.e. with painted crosses. Unfortunately, its quality is poor. Some experts suggest that it is a photomontage, so the topic is quite controversial (the whole story of Smirnov’s plane is described on the Arma Hobby blog).

18) I applied the target colours in many layers composed of uneven lines and spots.
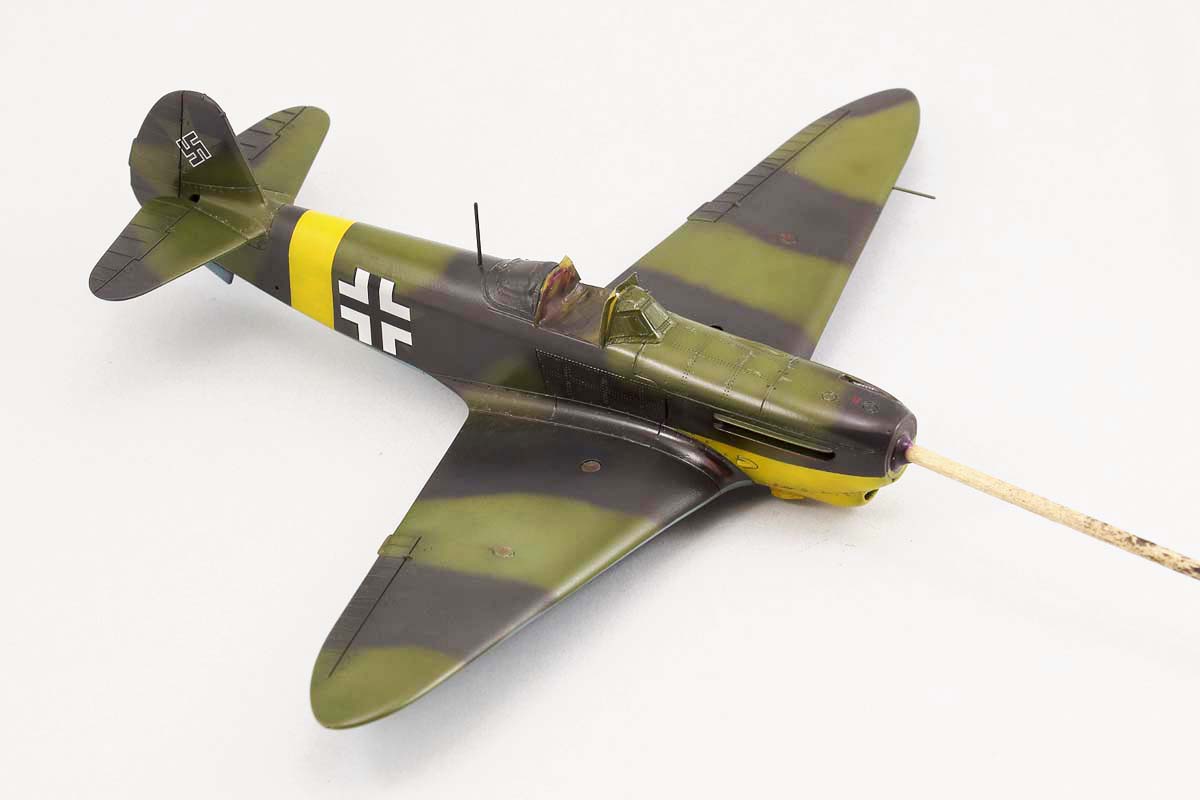
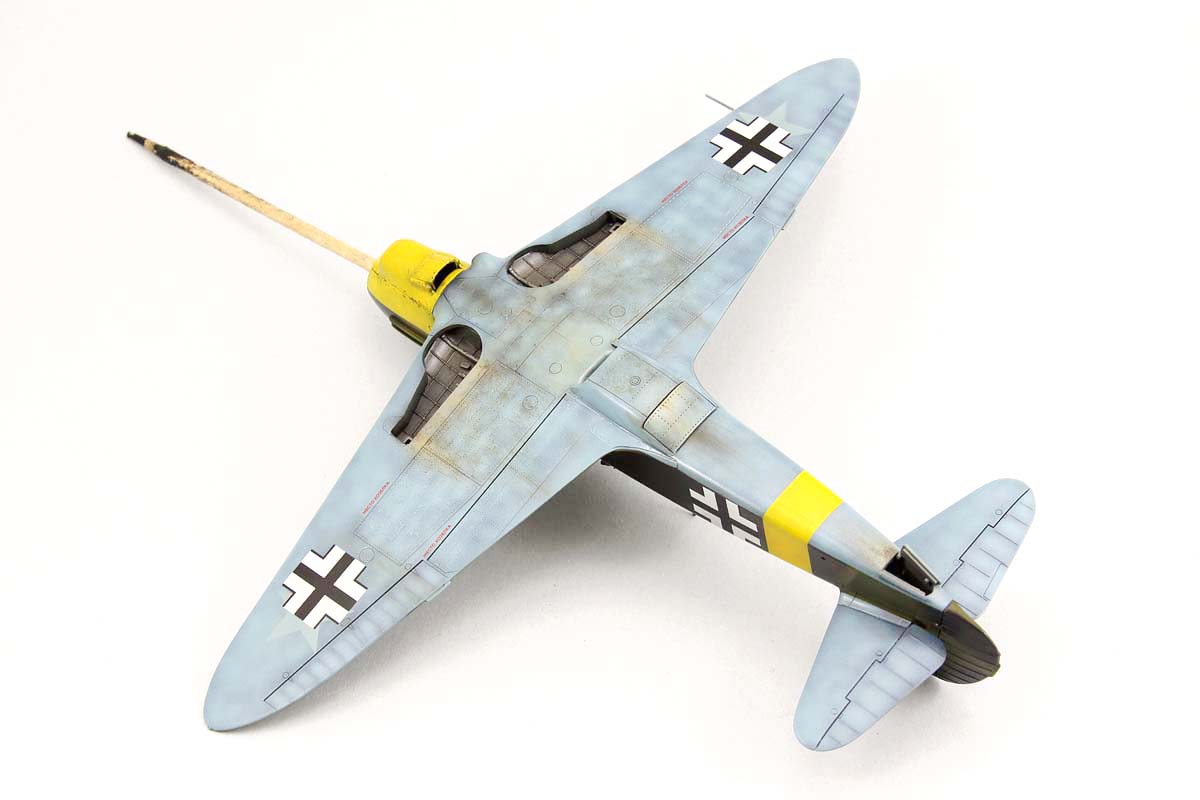
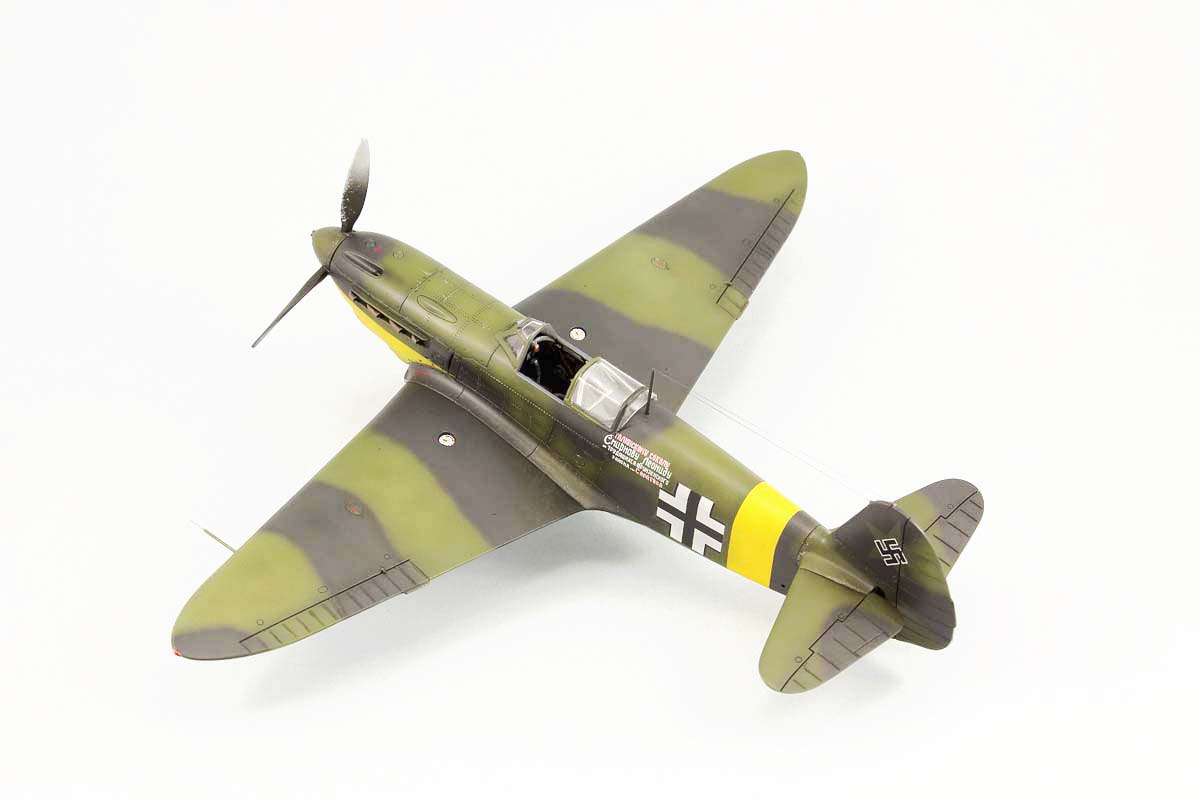
Colour profiles show the plane without Soviet national markings overpainted with German markings. Well, I can see overpainted stars to the left of the fuselage cross (under the foundation inscription and between the inscription and the cross), and on the tail, to the left of and above the swastika. They are subtly visible, almost blending with the colours of the aeroplane, but, in my opinion, you cannot drop anything on the defect of the photo, and you can see the underpainting on the real machine. In my model, I decided to reflect this visual effect by adding flavour to the miniature. After some thought, I chose the RLM 71 for three reasons. Firstly, it fits the historical period. Secondly, it is logical that the Germans would use their paint, and thirdly, it is quite similar to Soviet green and blends well with the colours on the model. Finally, I got exactly the result I wanted – the signs of stars are there. Barely visible, but they are. I cut out the shape of stars in self-adhesive paper and applied the colour with an airbrush. I made underpaintings on the bottom of the plane with the RLM 65 paint. After securing the model with glossy varnish, it was possible to apply decals and signs of use. As for the decals themselves, they apply very well. Swastikas consist of two elements, separate cross, and broken arms, which must be put on top of each other to get the correct marking. The cross could be slightly wider to make it easier to fit into the arms. Besides, the decals did not cause any problems.
19-22) Basic colours applied to the model and secured with a glossy varnish.
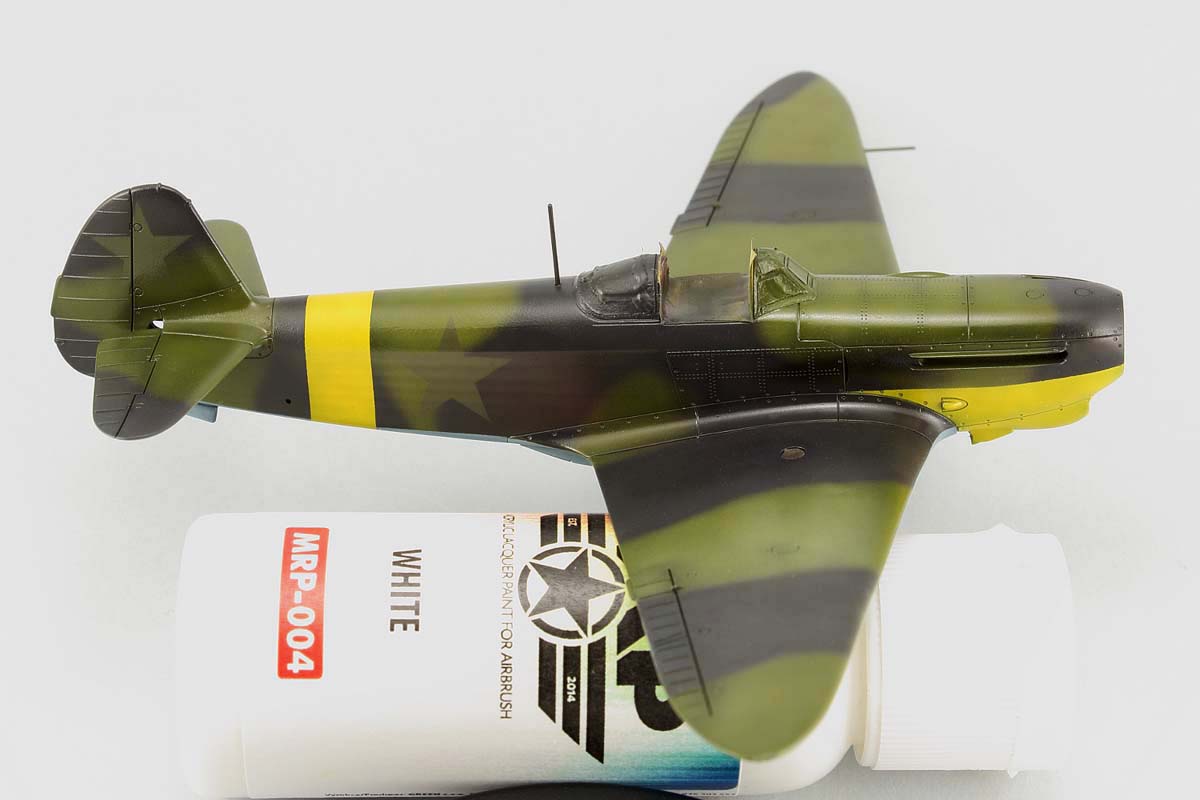
23-24) In the photo of the original plane, I see barely visible traces of the overpainted stars. I used the RLM 71 colour to make them. By the way, I also painted the stubs, slightly brightening their centre with light grey.
Worn out effects and finishing the build.
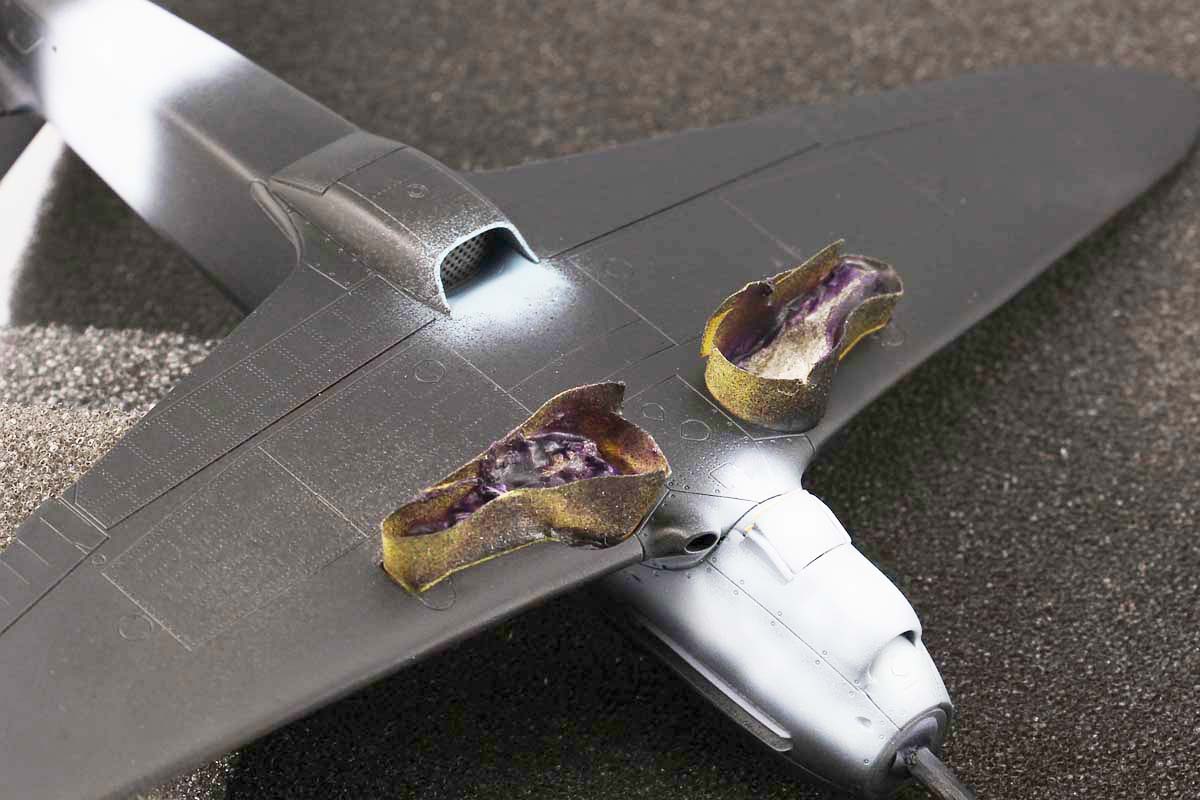
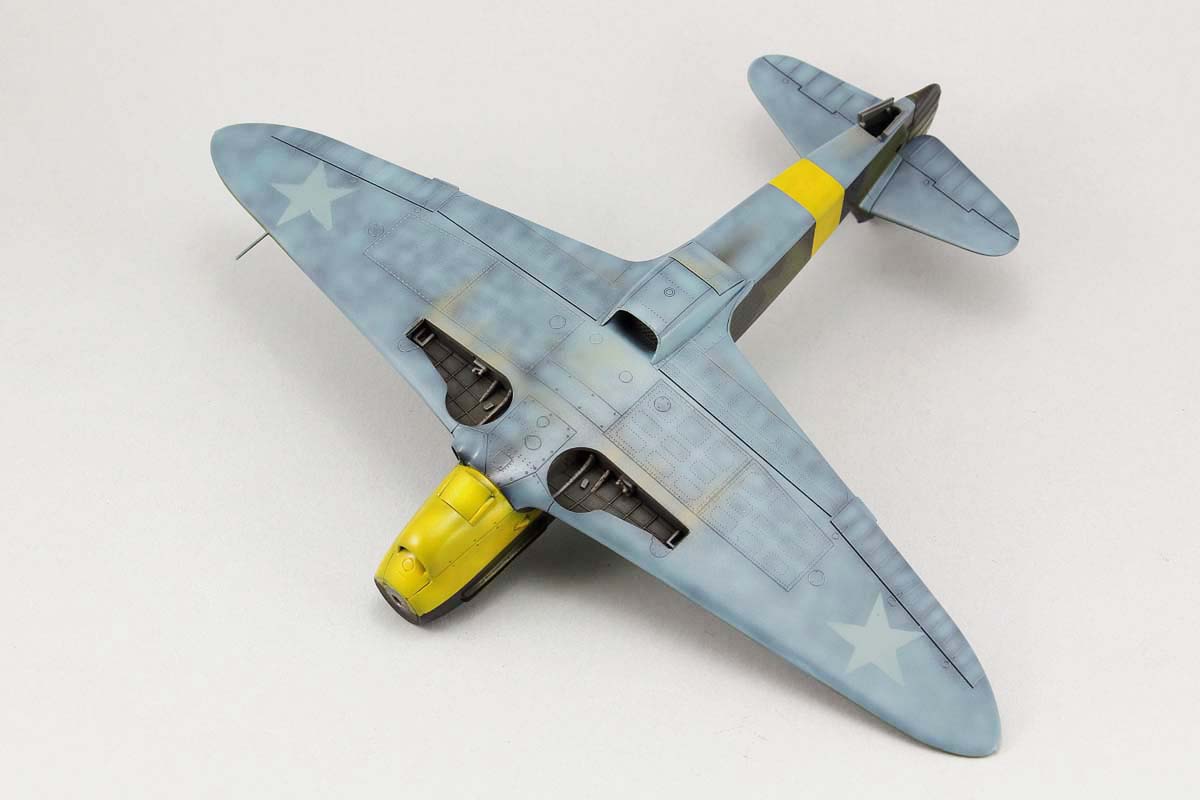
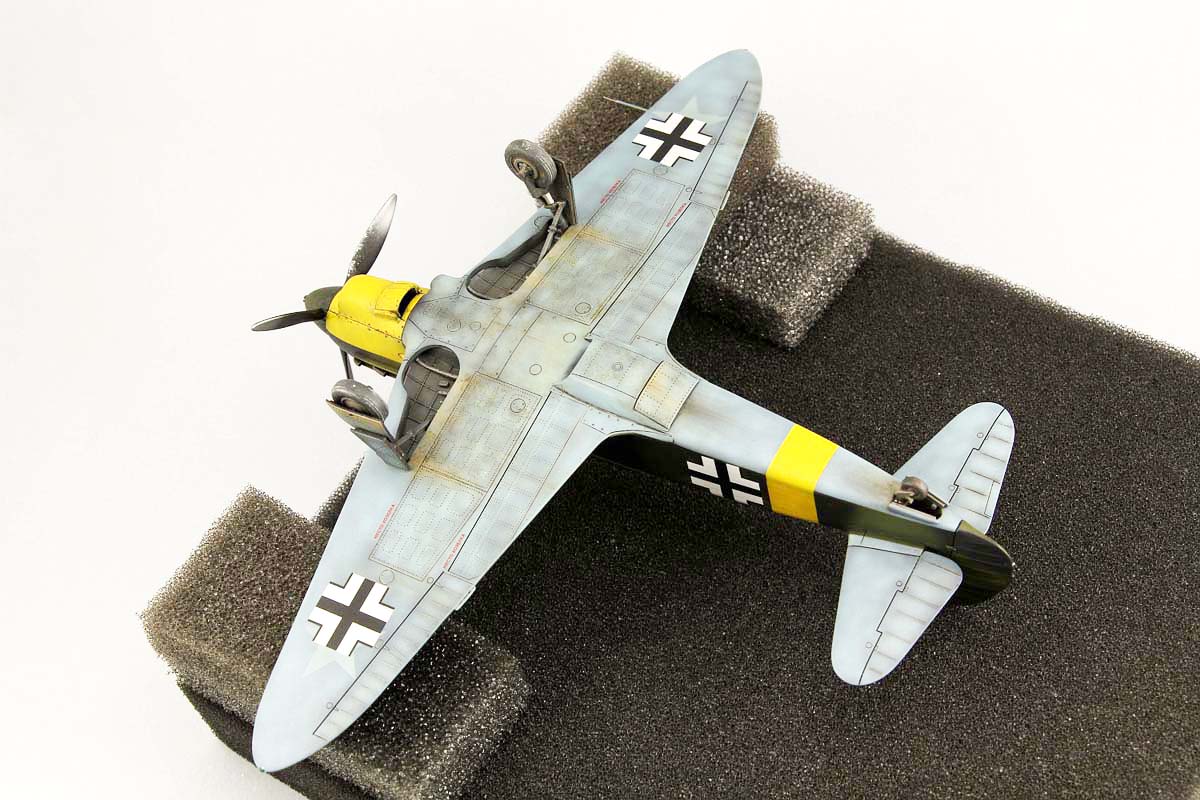
The original machine was quite worn, and I wanted to give my miniature the same look. I painted the undersurface with Tamiya Sand and Gunze Smoke Gray paints applied with an airbrush. Additional effects of dirt are Gunze Mud Brown oil paste, and oil paints for artists which I rubbed and ‘stuck’ into the model with a cotton swab and a wide paintbrush moistened with White Spirit. At the top, I similarly treated the wing-to-fuselage transition area. In places made of metal in a real aeroplane, I added chip ping with a brush made of basic colours brightened with white. The smoke is Smoke Gray again. I lighten the middle of the soot with a thin line of light grey paint. Snow-white decals definitely did not play with such a worn-out surface, so I darkened all the marks with a mist of dark grey paint applied with an airbrush. I covered the finished plane with Satin Hataka varnish, and I was able to start assembling the details.


25-27) I made the paint peeling with a brush using base colours with the addition of white.
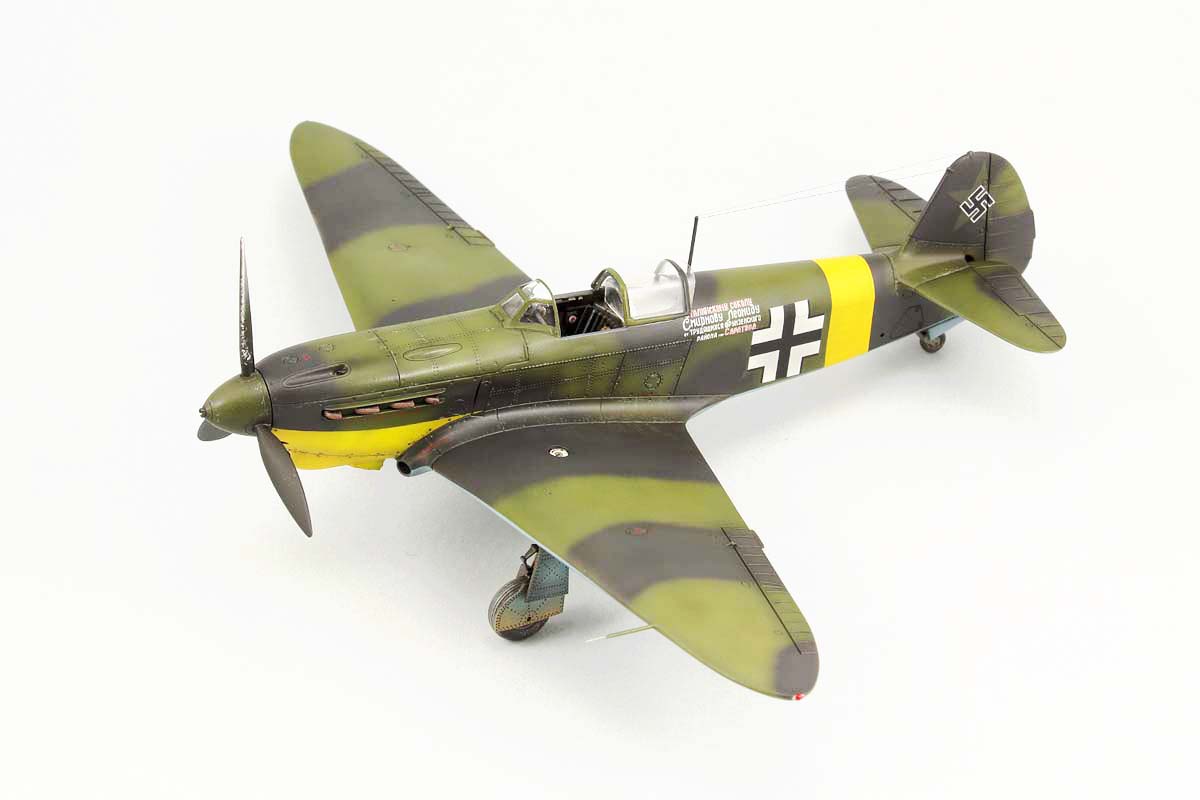
I replaced the exhaust stacks with a resin SBS product. The advantage, in this case, is that no trimming is required, as they are drilled. Unfortunately, they are a bit shorter than the set ones, but, fortunately, the hole in the model for their assembly is well thought out, so this problem is barely visible. The back of propeller blades of the plane was beautifully worn to the bare metal, which is clearly visible in the pictures so I decided to reproduce it in the model as well. I attached the sliding part of the glazing with two-component epoxy glue.

28-30) The last major work on the model is the positioning and shading of the decal. They apply without problems, but it is worthwhile to plan the position of the marks on the left side well.
The undercarriage requires a lot of attention, but it is something that ‘can be done’. First of all, I recommend deepening the dedicated holes in the wing spar, so that the undercarriage elements glued there more easily click into place. Unfortunately, I did it at the end, but it worked. As for the order of assembly, I suggest you first paste the tail wheel and the legs of the main landing gear. In the next step, I recommend glueing the tires (with glue that allows for slight corrections, for example with cyanoacrylate gel) and placing the model on wheels so that the tire deflection ‘hit’ the ground.
Then it would be good to glue the lower part of the undercarriage covers (the one that covers the wheels), then the hinges (glued to the spar) and finally the upper part of the covers (I additionally removed the ‘tabs’ from this part, which should rest on the recess). In my opinion, this sequence ensures the correct geometry and minimizes the risk of something breaking off during the process. After this small surgery, I was able to enjoy the spectacular view of the finished miniature.


Conclusion
It was definitely worth the time to build and upgrade the Arma Hobby model because the final result makes a great impression. It is not a trivial model, as it has quite a lot of parts, and some elements require more focus. On the other hand, with careful dry fitting and assembly, the construction will be trouble-free, and I can recommend everyone to face this set. A miniature made straight out of the box, whether as part of the Expert or Junior series, will look very good. And by reaching for additions from other manufacturers and adding resin and photoetched parts or very eye-catching decals, you can make a great miniature. It is nice to see the domestic producers enter the forefront of our modelling world.
English Translation by Dominik Sędziak
See also:

- Yak-1b Expert Set in Arma Hobby webstore
Virtual Editor, guest post publisher. When blog authors fall asleep he works unnoticed to improve website content quality.
This post is also available in:
 polski
